Map View and working with geolocation fields
Map View is a separately licensed add-on and is not available in Collections out-of-the-box (contact Support for details). When available, locations recorded in GIS (Geographical Information System) fields and fields with a Geolocation data type can be displayed on a map.
-
Details about configuring Geolocation fields can be found in the here.
-
Details about GIS implementation can be found in the here.
-
More details about Geolocation fields can be found in the Axiell Designer Help.
Map View is designed for displaying locations of objects, people and more on a map. Potable locations include storage locations for objects, places where objects were discovered or where they were produced, the places where individuals recorded in Persons and institutions (creators, authors, artists, etc.) were born and died, and so on. Map View opens by default in the main Collections window, but it can be detached and viewed in a separate window:

Map View is a licensed add-on to Collections and is not available out-of-the-box (contact Support for details). If it is available in your system, the Map View button will display in the top Toolbar when you are working in a data source![]() The management of a collection can involve a vast amount of information about objects / items / books, people and organizations, events, administration and more. This information is stored as records in data sources. Each data source stores a specific type of information: details about collection items, people, events, loans, and so on. that stores location information in fields designed to hold geolocation data. In the example above, birth.place and death.place are geolocation fields and these two locations can be shown on a map.
The management of a collection can involve a vast amount of information about objects / items / books, people and organizations, events, administration and more. This information is stored as records in data sources. Each data source stores a specific type of information: details about collection items, people, events, loans, and so on. that stores location information in fields designed to hold geolocation data. In the example above, birth.place and death.place are geolocation fields and these two locations can be shown on a map.
Geolocation fields
Two types of geolocation field are available in Axiell Collections:
- A Geographical Information System (GIS) field, which has a GeoJSON data type.
-AND-
- A field with a Geolocation data type.
Both types of field store a location that can be displayed on a map, and both allow a location to be selected on a map and saved to the field, but they do so differently. GIS functionality is a more recent addition to Collections and has superseded the earlier Geolocation approach to location mapping.
|
Data type |
|
||||
|---|---|---|---|---|---|
|
When GIS functionality is enabled in your system, locations are recorded in a Geographical thesaurus Authority data source A GIS field in the Geographical thesaurus has a Geo-json data type and can be identified by a map icon beside the field label. In Record details View, the icon indicates whether a location has been saved to the field or not:
Tip: The Edit Map location and View Map location windows are essentially the same as Map View. It may also be possible to search for locations on the Standard tab of the Search box. A searchable GIS field is also identified by an icon:
Details here. |
|||||
|
Locations saved to a Geo location field will display in Map View. A Geo location field that is also a Linked field
|


Map View functionality
Any locations saved to either type of geolocation field described above will display on a map in Map View. It is possible to view the location of the current record![]() The record currently displayed in Record details View or highlighted (with a solid background) in Result set View or Gallery View for instance. or to view the location of multiple records by marking
The record currently displayed in Record details View or highlighted (with a solid background) in Result set View or Gallery View for instance. or to view the location of multiple records by marking![]() Marking a record means selecting it by adding a tick to the record's checkbox in Result set View or Gallery View, and in Record Details View from Collections 1.15 onwards. One or more records can be marked and then actioned in some way (e.g. printed). them in Result set View and opening Map View by clicking its button in the top Toolbar.
Marking a record means selecting it by adding a tick to the record's checkbox in Result set View or Gallery View, and in Record Details View from Collections 1.15 onwards. One or more records can be marked and then actioned in some way (e.g. printed). them in Result set View and opening Map View by clicking its button in the top Toolbar.
The following functionality is available in Map View:
A record can have more than one location saved in a geolocation field, and every geolocation field with data in the current or marked records will be plotted on the map in Map View.
It is possible to hide the coloured markers for each geolocation field and to change the colour of the markers.
In the example above, birth.place and death.place are geolocation fields in a Persons and institutions record and both are plotted on the map and listed under Filter by field.
Note: If a geolocation field does not have a value, it will not be listed under Filter by field.
To hide the location marker for a field, click its checkbox to remove the tick:

Tip: If two fields share the same location, hiding one field will reveal the other!
To differentiate between fields on the map, change the colour of location markers:
-
Click the arrow to reveal the colour chart.
-
If you know the HTML code for the desired colour, key it into the top field.
-
Alternatively, drag the slider into the desired colour range.
-
Click anywhere on the colour chart. The HTML code for the selected colour will display:

-
Click Apply.
Note: This is only a temporary change. The colour will revert to the default colour when next you open Map View or run a search in the current data source.
There are several ways to zoom in and out around the central point of the map:
- Click the + / -.
- If supported by your mouse, use your mouse scroll wheel (or equivalent slider).
The current zoom level (0 to 19) is indicated below the + / - buttons.
Tip: When you have zoomed in, you can bring an off-screen area of the map into view by clicking the map, dragging it and releasing the mouse button.
When the map is zoomed in, click the Overview map icon in the bottom left of the window to view the zoomed portion of the map (the dotted area in the Overview map) within the context of its surrounding area:
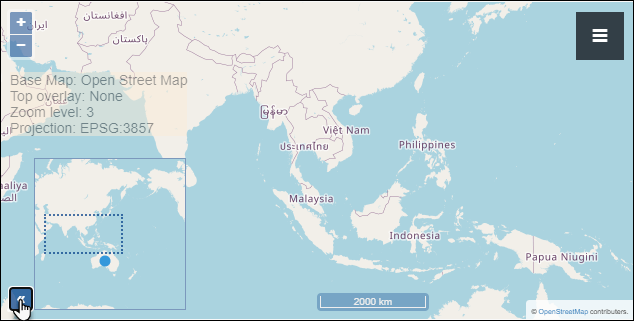
Click the icon again to close the inserted display.
The Map menu
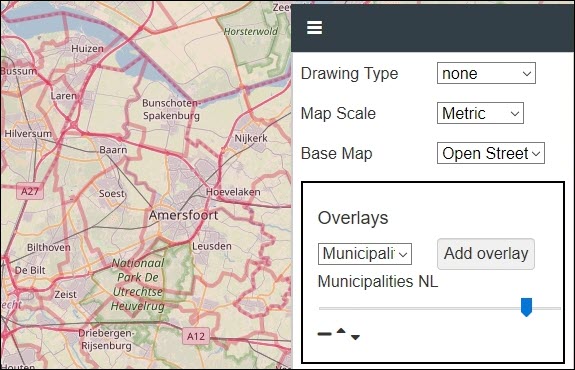
When viewing one or more records (rather than adding or editing a record), the Map menu includes options to change the scale and base map in Map View, to select an overlay (if available), display a location by entering its longitude and latitude; and to search for a location by its name (if a Geocoding Web Service is enabled in your system):
Select the Map menu button for the following options:

|
Option |
Details |
|---|---|
|
The current scale is shown at the bottom of the map. By default it is metric. The following scales are available from the drop list:
|
|
|
The default base map is the Open Street Map. If other base maps are available, they can be selected from this drop list. |
|
|
One or more overlays for the base map may be available from this drop list, perhaps showing municipality borders, vegetation types or historical landmarks for example. To apply an overlay:
Here we see the Municipalities overlay (in red) over the base map:
|
|
|
If GIS functionality is available in your system, adding / editing a location (in a field with a GeoJSON data type) stores the location and other metadata such as the current base map and layer. When this checkbox is ticked, locations will only display if their layer metadata matches the current base map and overlay. Note: If your system saves location date to Geolocation fields, ticking this checkbox will hide all locations. |
|
|
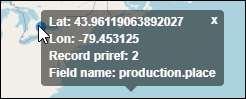
When you click anywhere on the map, the location coordinates display in a pop-up as latitude and longitude by default:
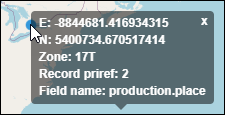
When this checkbox is ticked, location coordinates display in UTM (Universal Transverse Mercator coordinate system):
|
|
|
If you know the latitude and longitude of a location, enter these values and click Locate to zoom in to the location. |
|
|
If a Geocoding Web Service is available, it is possible to search for a location by entering its name in the search field and clicking Search. Matching locations will display below the search field:
Click a listed name to zoom in on that location:
|


If GIS functionality is available in your system, it is possible to add / edit a location directly from a map when editing the current record![]() The record currently displayed in Record details View or highlighted (with a solid background) in Result set View or Gallery View for instance. in the Geographical thesaurus. When editing a record, the Map menu includes additional options.
The record currently displayed in Record details View or highlighted (with a solid background) in Result set View or Gallery View for instance. in the Geographical thesaurus. When editing a record, the Map menu includes additional options.
Note: If GIS functionality is not available, you update a location in the Find data for the field box. Details here.
How to add / edit a location
In the Geographical thesaurus:
- Add a new record or edit the current record
 The record currently displayed in Record details View or highlighted (with a solid background) in Result set View or Gallery View for instance..
 - In Record details View, locate the geolocation field (typically labelled something like Geolocation or Map). The field is easily identified by the GIS icon, which will be one of the following:

No location has been saved to the field.

A location has already been saved to the field.
In this example the field is called Geolocation:

- Click the icon to open an Edit Map location window.
This is similar to Map View but includes additional options in the Map menu:

-
To select one or more locations on the map, start by selecting a Drawing Type tool.
All available options for working in the Edit Map location are described here:
Option
Details
Drop list with tools for specifying one or more locations on the map. It is possible to select a single point and/or a line; it is also possible to define an area by drawing a circle or polygon on the map.
Tip: While it is possible to mark multiple spots and/or areas on a map and save them all to a single geolocation field, typically you will define a single point or area for each geolocation field.
Details
Tool
Details
None
When you select one of the other drawing tools, it remains active until you click OK or Cancel (which close the Edit Map location window) or Clear (which removes any marks you have added to the map).
If you have finished drawing on the map and wish to continue working in the Edit Map location window, you can select None to disable the drawing tool.
Point
Click the map to mark a single spot.
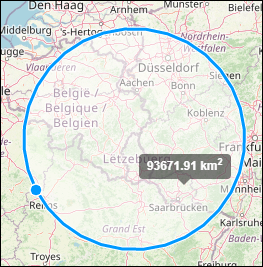
Circle
Click a spot that will be the centre of the circle, release the mouse button and move the mouse to widen the circle. Click again to finish the circle.
Click the Show Area checkbox to show the area of the circle.
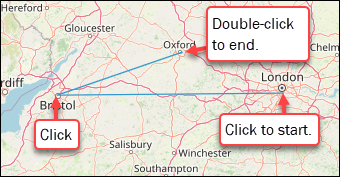
LineString
Draw one or more consecutive straight lines.
To draw a single line, click the starting point, move the mouse and double-click at the end point.
To draw two or more consecutive lines, click the starting point, move the mouse and click, move the mouse again and click. Repeat until your drawing is complete and double-click at the end point:
Click the Show Distances checkbox to show the length (distance) of the line.
Polygon
Draw a closed shape with straight lines. Click the starting point, click the next point, etc., and double-click the penultimate corner to close the polygon:
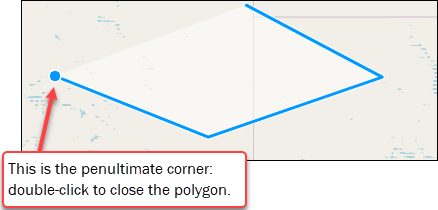
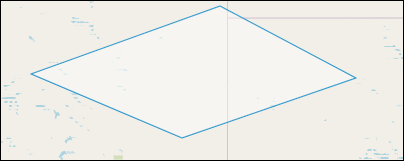
Click the Show Area checkbox to show the area of the polygon.
The current scale is shown at the bottom of the map. By default it is metric. The following scales are available from the drop list:
- Metric
- Degrees
- Imperial
- Nautical
- US
Base Map
The default base map is the Open Street Map. If other base maps are available, they can be selected from this drop list.
Overlays
One or more overlays for the base map may be available from this drop list, perhaps showing municipality borders, vegetation types or historical landmarks for example.
Details
To apply an overlay:
- Select the overlay from the drop list.
- Click Add overlay.
The selected overlay will be shown on top of the base map, and it will be listed below the Overlays heading:
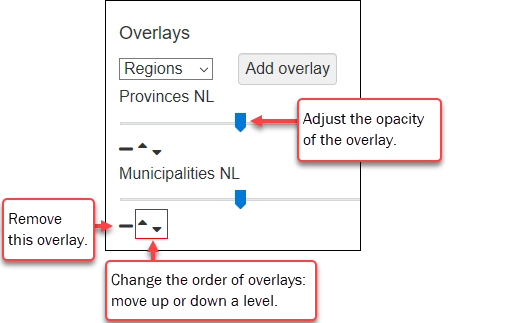
More than one overlay can be applied. It is possible to:
- Adjust the opacity of an overlay.
- Change the order of overlays.
- Remove an overlay from the base map.
Show Area
When using the Circle or Polygon drawing tool, the area of the enclosed space will display if this checkbox is ticked:
Show Distances
When using the LineString drawing tool, the length (distance) will be shown if this checkbox is ticked:

Show location in UTM
When you click anywhere on the map, the location coordinates display in a pop-up as latitude and longitude by default:
When this checkbox is ticked, location coordinates display in UTM (Universal Transverse Mercator coordinate system):
Locate
If you know the latitude and longitude of a location, enter these values and click Locate to zoom in to the location.
- When you have marked locations on the map, you have three options:
Button
Description
OK
Saves points and/or areas marked on the map, along with details about the currently selected base map and layer, to the GIS field, closing the Edit Map location window.
Cancel
Close the Edit Map location window without saving any changes you have made to the map.
Clear
Remove all marks on the map.